How to manage your manufacturing with the MRP, PLM, Maintenance, and Quality apps
Odoo offers an effective solution for your manufacturing needs
Odoo for Manufacturing
Odoo always has a solution ready for you. The Manufacturing applications include MRP, PLM, Maintenance
Odoo covers every software need of your manufacturing
All the departments involved in the process are immediately updated, quickly solving issues to continue production as soon as possible. With all this information in one place, it is easy sorting through it - metrics can be filtered, grouped and displayed in a histogram or pivot table
MRP application
Material Requirements Planning (MRP) is a software used to manage manufacturing processes that
The MRP application allows manufacture orders to be planned automatically, based on demand forecast, stock available and indirect demand. The manufacturing department has access to everything the employees need to work on a tablet, including quality checks during production or the ability to block orders if something goes wrong (a broken tool, for example).
The quality department reviews
BoM
To start we need to create products and components in the Master Data menu, click Products and set it up. Both products and components are created the same, Odoo doesn't tell the difference between them.
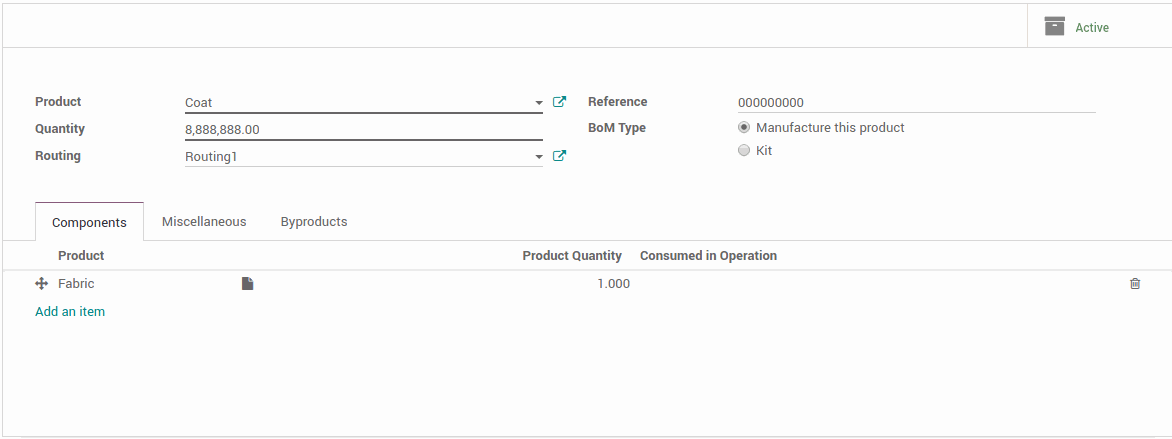
Now we can create a bill of materials (BoM), a document with product components, quantity and the process required to manufacture the product. A product can have more than one BoM, but a BoM can only be associated with one product and describe its variants.
On the
Routing can be added to multiple BoMs (a BoM can only have one Routing, however), by selecting a routing option - or creating one right there - in Settings, located in Configuration. They can also be created on Routings, under the Master Data menu. To be added to a BoM, a routing needs to be selected when creating the BoM or edit an existing one.
On the Settings page, tick all the options you need to properly set up your manufacturing. For instance, by-products are anything produced in addition to the primary products, and in a BoM, they can be included in the Byproducts tab.
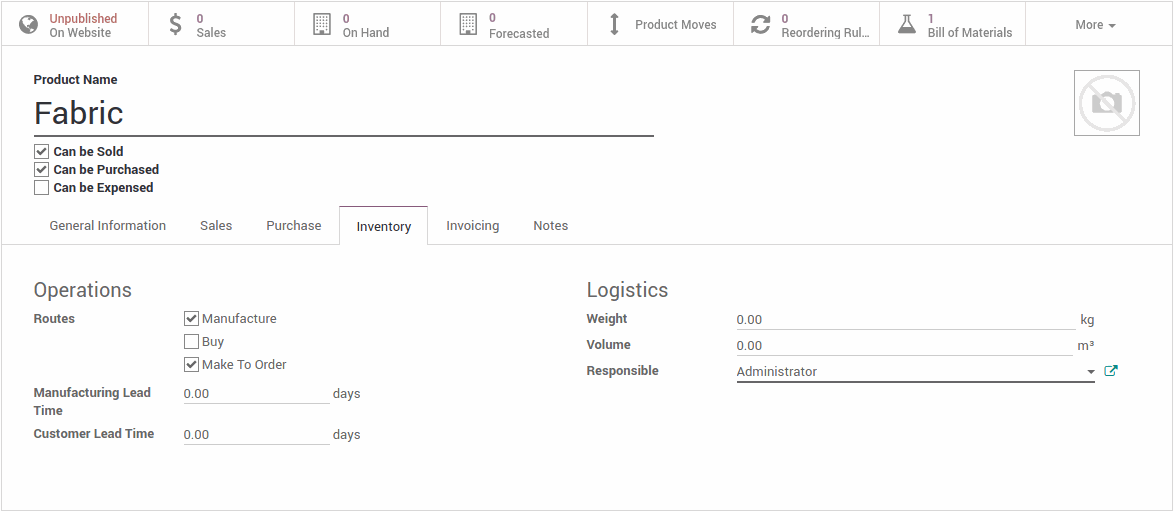
A multi-level BoM is used when to create a product, sub-assemblies are required. Everytime manufacturing orders of the main product are issued, the manufacturing orders for the sub-assemblies are created as well. To do this, make a BoM for each sub-assembly and another for the main product, there, in the Components tab, include all the sub-assemblies.
The sub-assemblies are configured on the Products page, under Master Data. Select the product form, click Edit and tick the Manufacture and Make To Order Routes
Work Centers
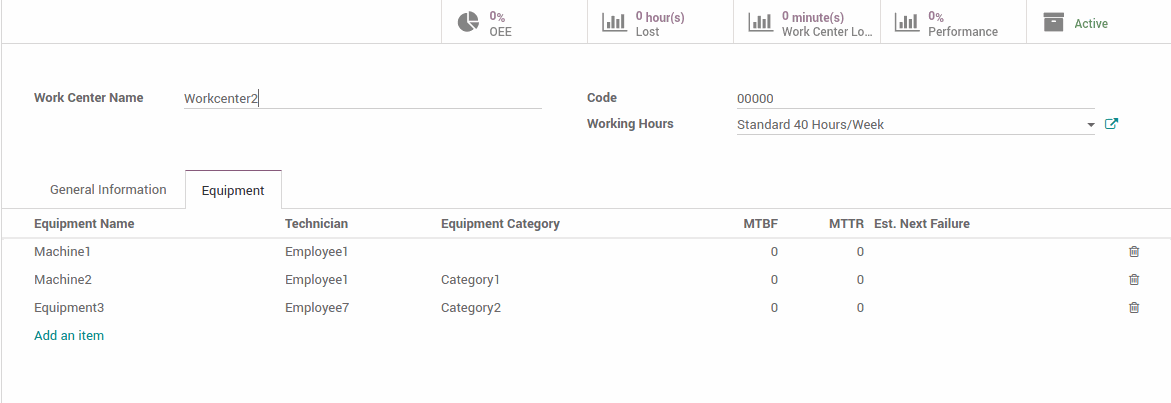
Companies can have more than one place to produce their products, so Odoo has work centers to help with their management. Work centers are the places where the manufacturing takes place and the work orders are performed. Under the
Click create and fill out the fields with information. Don’t forget the General Information and the Equipment tabs at the bottom for more accurate reporting. The top tabs inform you of the work center’s OEE, lost hours, performance and loads.
The work centers are listed on that page and displayed on the Dashboard, where you can see the
Click on the Work Orders button and choose one of the orders to Pause, Mark as Done or other actions by clicking on the top left menu next to the Pause button.
Manufacturing Orders
Odoo has two ways of managing manufacturing, one only uses one document - a manufacturing order - and the second uses multiple documents which allow for a more accurate control over the process.
The first way is the default behavior in Odoo. It’s rather simple if you don’t need a higher level of control of work orders or routings, if all of your products are produced in one place, in one step. There are two steps of planning: create the manufacturing order and record production.
On the Operations main menu, click Manufacturing Orders and create one in the new window. Your orders will be listed on that page and viewed on the Planning menu by selecting the options Planning by Production or Planning by Workcenter in a Gantt chart.
After the order is created, a new menu will appear where you can choose new actions to take. To record Production, simply hit Produce, set the quantity and click the Record Production button.
Here, make Quality Alerts and Checks (Pass or Fail the product), scrap orders, request Maintenance or mark the order as done.
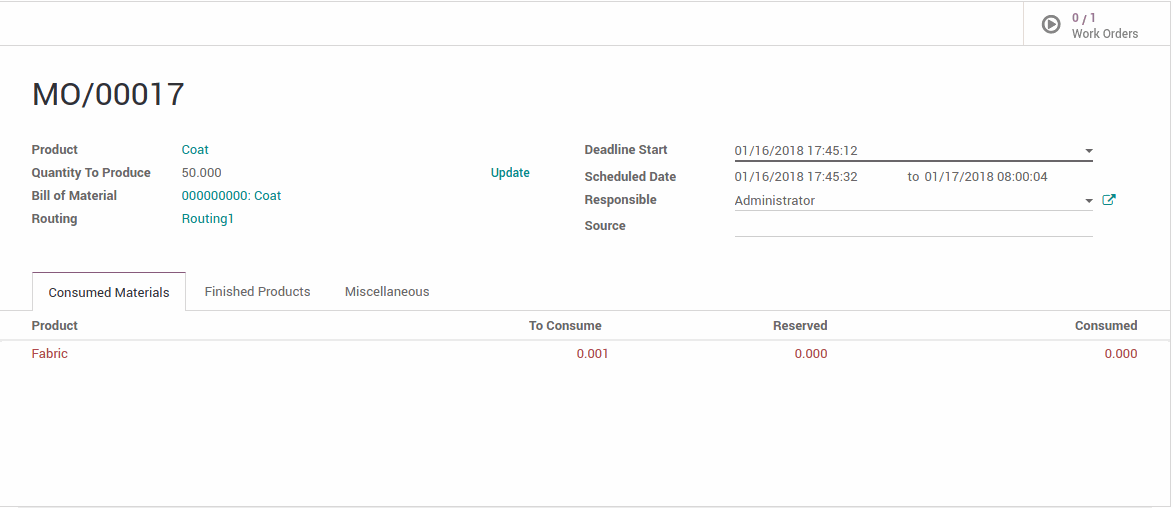
This will enable additional options when creating Manufacturing Orders, such as Routings from the BoMs and
Under the Operations main menu, you can also access and create Unbuild Orders and Scrap Orders
Click on Add a Product and select one from the list or create a new one right there
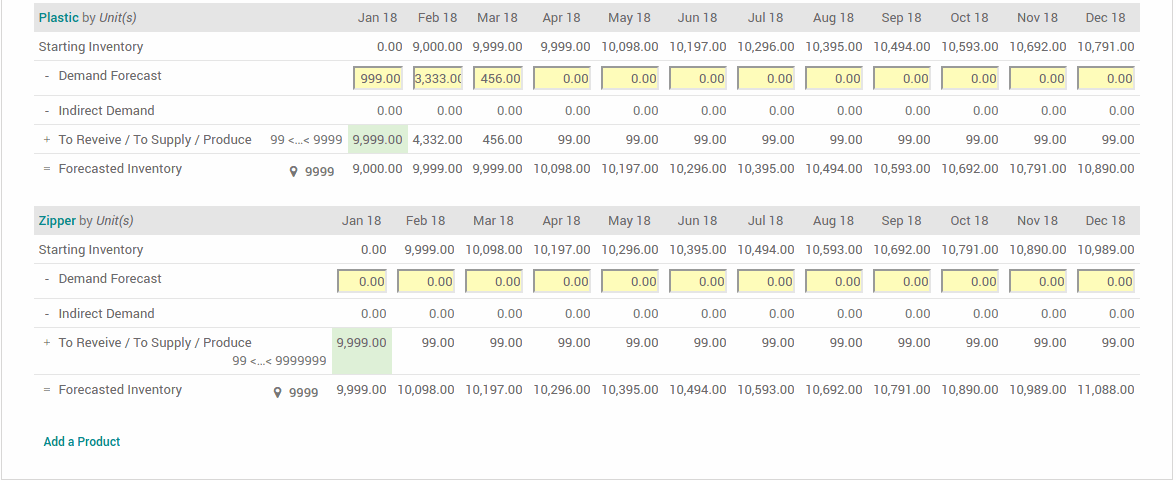
Click on Set Target on the last table line to define the number of units and the table will automatically fill the cells. Edit the Demand Forecast and To Revive/To Supply/Produce cells by selecting them
This feature is helpful to preview forecasts of demand and to prepare accordingly, the MPS calculates the figures using the timeline as a base
Quality Management
During production, it is imperative to check on the products to make sure they’re made as they should - no defects or imperfections that compromise the usability or aesthetics of the product.
The Quality application allows you to define quality control points, check inventory after and during production. A quality control plan can be defined and be set up to be triggered in-process, final and receiving inspections. The quality department is able to manage and track PPAP submissions, configure SPC and attach PFMEA documents to routings.
In Configuration, set up your quality teams. Now in the
A new window will open, complete the fields required - to which product and step the point is needed, assign a quality team or control type. In the same menu, the Quality Checks shows the requests made during production to verify the quality of a product. Select one and Pass or Fail (or other options of the test) the product
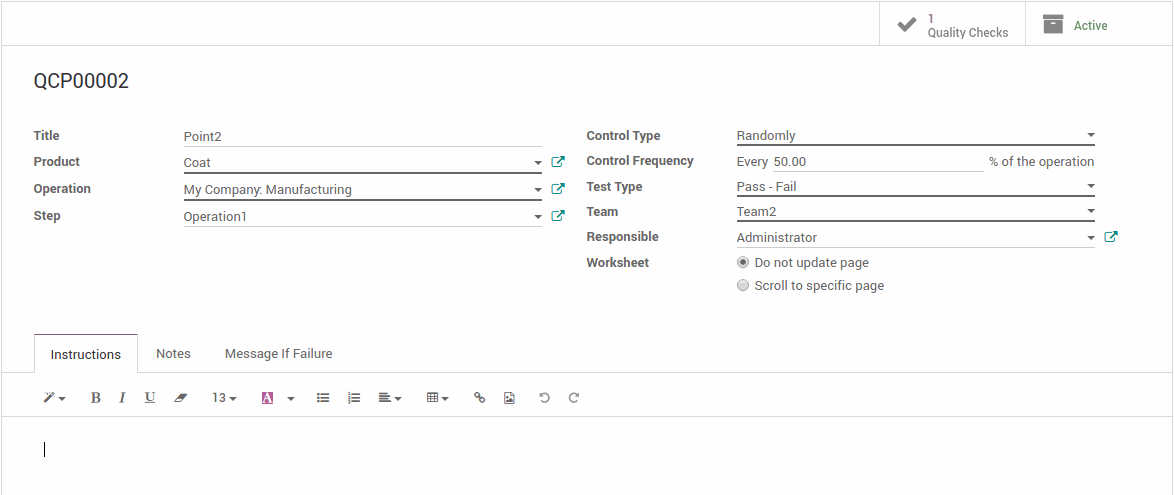
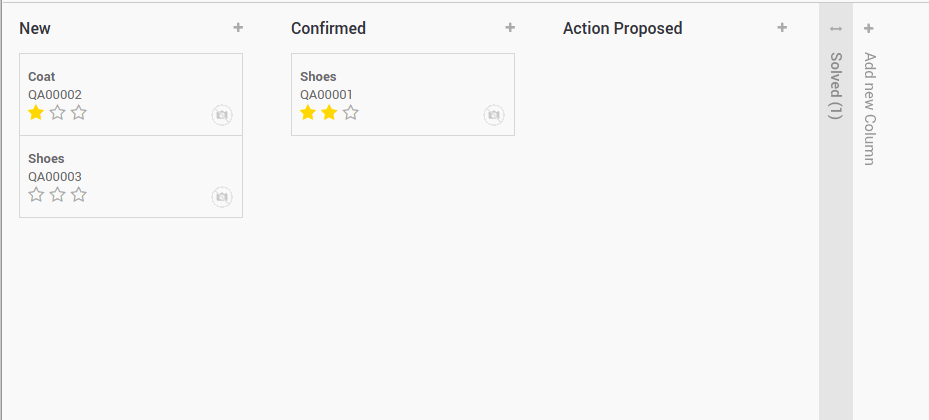
Quality Alerts can be created and received on the same main menu, where a kanban view of the alerts is displayed.
Move the alerts between stages manually by drag and drop actions or automatically when selecting the alert and clicking on the buttons on the top right.
The Reporting menu gives a few different charts and
Maintenance
Maintenance is an important part to keep the business going. If something goes wrong with the equipment, it needs to be fixed as fast as possible, and have regular maintenance of the equipment as a prevention method.
Odoo developed the Maintenance application, where maintenance requests are received in real-time and preventive maintenance is automated.
The Dashboard presents your teams, indicating how many requests they have, scheduled activities, top priorities and other options for an immediate update without sorting through other menus.
The Equipment menu gives access to Work Centers (create and edit them) and Machines and Tools - create new equipment, schedule preventive maintenance (Maintenance tab), assign a team, a technician and a work center to it. In the Machines and Tools page, maintenance requests on a piece of equipment can be seen in red.
Click on the clock icon to schedule an activity.
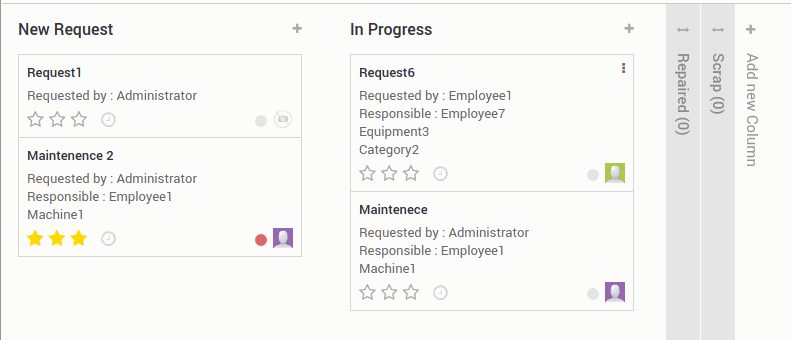
See all the maintenance requests in the Maintenance menu. They are sorted by date (oldest in the bottom), the star icons represent the priority and the round icons assign a status to the requests.
You can easily track and get an overview of the progress of the requests and advance stages by dragging and dropping. The Maintenance Calendar allows you to schedule maintenances and see the ones already planned
Product Lifecycle Management
Product Lifecycle Management (PLM) is an application created for engineering management. With this app, the engineering department has access to all the products and BoMs in the Master Data menu.
Users can add new products or BoMs, as well as edit them.
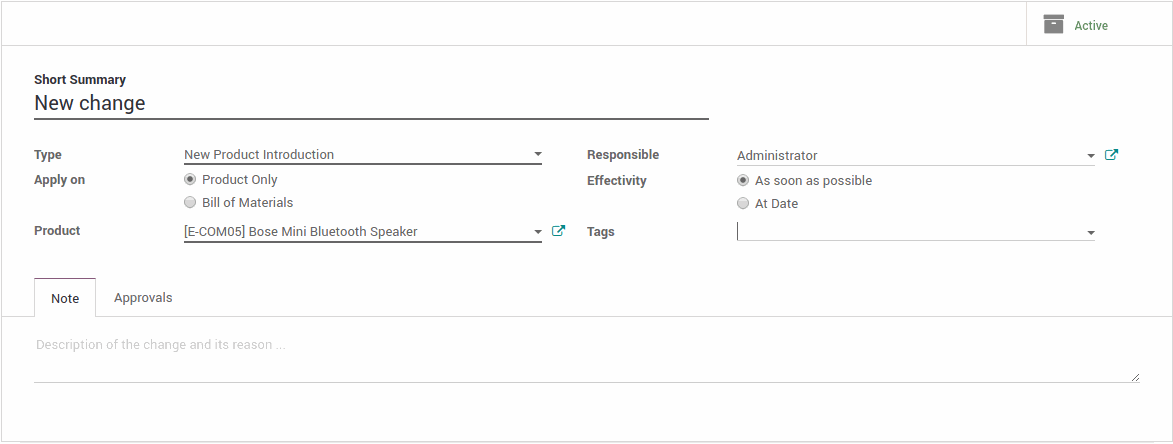
Create a new change order in the Changes menu and select Engineering Change Orders.
The orders can be made for a product or for a BoM. After filling the form with information, the new order is visible in the order’s page.
The page displays the orders in kanban view, with the same possibilities mentioned above.
To start a revision, click on the desired order and then on the Start New Revision button bellow Edit.

In the dashboard of the PLM application, you can view immediately how many Engineering changes there are and be sent to the orders page by clicking on the text.
Get updated ECO reports in the reporting menu

